Introduction
AlphaSim has released another great one. I have a large
soft spot for WWII Warbirds and this one was a major
player in that little fracas. I was pleased and excited
when Mutley suggested I write a review for AlphaSim’s
B-24. I like the plane and I like the publisher. What’s
not to like? This is, by the way, a full-featured
package for both FS9 and FSX.
If you’ve read my work before, you’ll know I’m not a man
of few words. This one’s no exception – a big airplane
deserves a big review. So grab a beer and get yourself
comfortable. We’re going for a ride.
History
The Consolidated B-24 Liberator retains the record to
this day as the most produced US military airplane.
Something in the neighbourhood of 18,500 of all variants
were built, a number made all the more astonishing by
the fact that all were produced in a six-year period,
from 1940-1945. Built in parallel at several locations,
at one point a single factory near Detroit, Michigan was
producing a finished B-24 roughly every 100 minutes,
night and day, seven days a week. I don’t know if the
Nazi government was aware of that; if they were, one
wonders why they did not see the handwriting on the wall
much earlier.
Serving with distinction in the daylight bombing
campaign in Europe alongside its sturdy companion the
B-17, the Liberator also flew in large numbers in
numerous other roles. It was utilized extensively for
maritime patrol, for which it was very well suited.
Dozens of U-Boats met their fate at the hands of
Liberators on long Atlantic patrol flights; many more
were stymied in their hunt for Allied shipping, forced
to hide from the searching patrol bombers, thereby
saving innumerable ships and the men and materials they
contained. The B-24 type was also employed extensively
as tanker and cargo plane and transport and for a number
of other duties. These were not one-off or small time
operations – large numbers were deployed to all of those
less glamorous duties. Winston Churchill’s personal
transport aircraft was a single-tail version of the B-24
which he christened “Commando”.
|
 |
In the Pacific theatre too, the B-24 was a workhorse,
put in harness in large numbers following a decision to
standardize on the Liberator as the long-range bomber in
that theatre.
It was used extensively in the PTO by the
US and Allies, shouldering the load as the front-line
long-range bomber until supplanted by the emerging B-29
late in the war.
Here too it served in all those
auxiliary roles, where the vast distances of the Pacific
made its long range invaluable. |
|
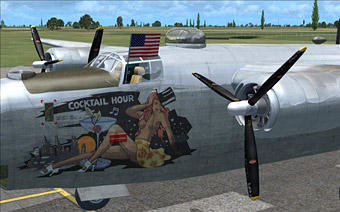
B-24 "Cocktail Hour" |
|
Comparisons between the B-24 and the B-17 are inevitable
and rage to this day as to which was “the best”,
particularly where the dwindling company of veterans who
flew in one or the other still gather. Like so many
things, it all depends upon how you measure it. In the
final analysis, comparing all the performance specs, the
Liberator was the equal of the B-17 or better in every
category. It’s most frequently cited drawback doesn’t
appear in the performance tables however. The venerable
Liberator had a glass jaw compared to the B-17, whose
ability to take damage and fly home was legendary. In
that single attribute the B-24 took a back seat.
|
 |
|
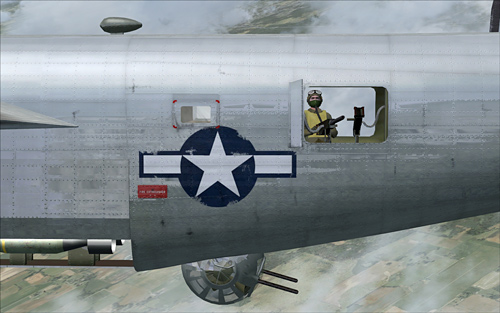
Over the Target |
By any measure, however, the B-24 was one of the great
planes of the WWII era. Only a few remain today for us
to see. Fewer yet, a mere handful, are still flyable
thanks to the loving care of a fortunate few and the
donations of a multitude who consider the preservation
of such icons important. I had the privilege to see one
of them in person recently and was reminded again how
rare that opportunity is becoming.
AlphaSim is to be congratulated. We who revel in such
things should be mindful that their efforts help to
preserve the memory, the history and the heritage, if
not the actual artefacts of those historic Warbirds. All
too soon, like the endangered species that they are, the
real aircraft will disappear entirely from the skies,
succumbing to old age, corrosion, wear and tear,
accidents and eventually just to avoidance of the risk
of flying something so rare and irreplaceable. In the
meantime, we can enjoy a very credible reminder of one
of the aviation lynchpins of that era. Join me now as we
take a hard look at AlphaSim’s B-24 Liberator, a bird to
remember.
AC Models
|
 |
|
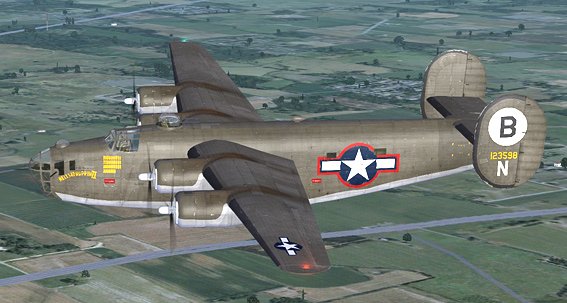
B-24 D |
As usual, AlphaSim has put together a credible and
representative package of models. Included are two B-24
D models, those of the glazed and turret-less nose.
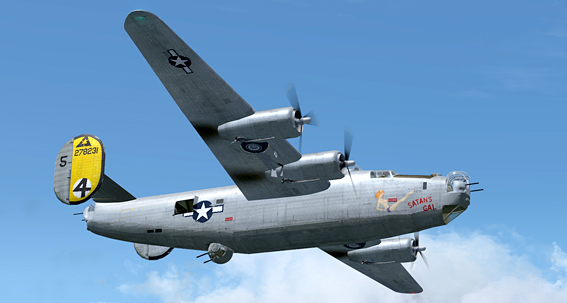
There are also two B-24 Js, visually indistinguishable
from the B-24 H (not included). These two near-identical
twins (at least on the exterior) are generally
considered to be the definitive version and together
accounted for about 50% of the total B-24 production
run.
Rounding out the stable is a single example of the B-24
G, sporting the nose turret of the Js, and a nose
section that is so slightly different from the J and H
that only their mother can tell them apart.
|
 |
|
B-24 J |
As expected from AlphaSim, the liveries are authentic,
detailed and exceedingly well rendered. The FSX versions
benefit from texture sets created in 2048 X 2048
resolution and are DX10 compatible. They include
“…interior self-shadowing, realistic spec and shine and
custom bump mapping to bring every rivet and surface to
life.” The FS9 versions are also excellent – as good as
anything I’ve seen for that sim. In the face of all
that, simulator performance in both versions was not
adversely affected. Though I didn’t do formal testing of
frame rates, I never saw any ill effects.
UK users might be disappointed that all five of the
models feature US paint jobs, but ownership includes a
paint kit each for FS9 and FSX in .psd (Photoshop)
format. Those must be downloaded separately because they
are very large. This might just be your opportunity to
become an accomplished re-painter.
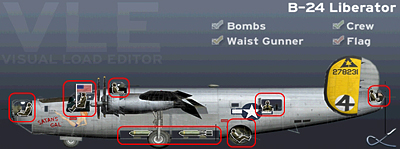
There’s something new to me in this package, a feature
AS calls a Visual Load Editor interface. I’ve seen
various aircraft configuration editors a few times in
the past but they are accessed outside the sim. This one
is a pop-up, able to be used “on the fly” with immediate
results. Shft-6 pops it up and check boxes toggle four
items between visibility and invisibility; bombs in the
bomb bay (you have to open the bomb bay doors to
actually see them, of course), the aircrew, including
gunners, a flag from the cockpit window and most
interestingly, a gunner who appears at an opened waist
door and traverses his .50 calibre gun about. It’s all
about immersion.
 |
|
Visual Load Editor |
There’s lots of visual detail, much of it animated. Cowl
flaps have three positions and are individually
controllable from the cockpit from a set of
three-position switches. When the engines are off, the
propellers will feather in response to the prop levers.
All the aircrew are realistically garbed and animated.
Engine starting smoke is quite well done. There are
contrails at altitude, tire smoke at touchdown, and a
faint exhaust plume at lower altitudes – maybe I was
running those P&Ws just a little too rich. Propellers
and spinner hubs appear to rotate slowly and the blades
are a broad blur that changes rate with throttle
settings. These are very good but would benefit from a
full prop disc image too.
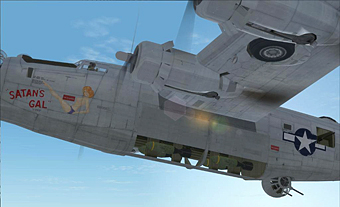
The cockpit side windows have a “blister” that is
visible in the external view. That feature allowed the
pilot and co-pilot to get their eye that little bit
further outboard for better visibility. Landing gear
details are very good. Rolling bomb bay doors of a
unique style on the B-24 cycle realistically and reveal
the bombs if they are turned on in the Visual Load
Editor. The cockpit side-windows slide open on command.
The underside can only be appreciated in flight from the
spot plane view.
The turbochargers, those all-important
devices that allowed the engines to operate at great
height, are set into the underside of the nacelles and
are virtually invisible in ground views.
The ball turret
descends into place in response to the tail-hook key.
The exposed main-gear tires nestle into their
wing-pockets. |
 |
| |
Letting it all hang out |
The nose art is very good, ranging from text-only
through mildly profane to bawdy. Some appear on both
sides of the AC. All the exteriors are suitably aged and
weathered with some chipped and scarred paint here and
there indicating a little wear and tear and hangar rash.
There are exhaust stains and oil stains on the wings.
All of these add greatly to the feeling of realism. If
these things leaked oil on the ramp they’d be perfect.
All that is just eye-candy of course, but is a pretty
important part of what we pay for in this hobby of ours.
AlphaSim appears to have spent a lot of time on this and
did a fine job on it. The proof’s in the flying,
however, so let’s go fly it.
Flying
I decided the best way to get up close and familiar with
this thing was to make some long flights. Killing two
birds with one stone, I “bought” the B-24 in my
favourite
cargo-flying game and proceeded to make a trash-hauler
of it. Is that sacrilegious? I hope not. I’ve made
several flights of more than 500 miles each and feel
like I’ve gotten to know the Liberator pretty well in
good weather and bad, in all phases of flight.
No one is ever going to mistake this thing for a
fighter. If you like yanking and banking and inverted
flight, go buy a Spitfire. That’s not what this plane
did. The manual specifically prohibits the following…
-Loop
-360° roll
-Intentional spin
-Inverted flight
-Immelmann
-Vertical bank
I surmise that un-intentional spins and 180 degree rolls
were OK, though I guess maybe the vertical bank rules
out the latter too. I do note that the split-S is not
specifically forbidden, but didn’t try one as I’m too
cheap to risk the resulting cargo damage. ACM manoeuvres
are not what the Liberator was built for. You might be
able to make it roll but the guys flying them in 1944
were getting white knuckles doing their very best to
prevent that. What it did best was haul a heavy load a
long way while carrying enough defensive armament to
keep the wolves away from the door – mostly - when in
the company of a sufficient number of its brothers.
|
 |
|
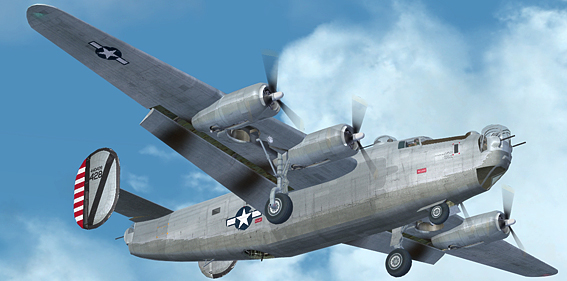
Showing off external self shadowing (FSX Only) |
 |
When you mount the beast, you’ll see a box asking you to
make a choice about controls. This takes a little
explaining.
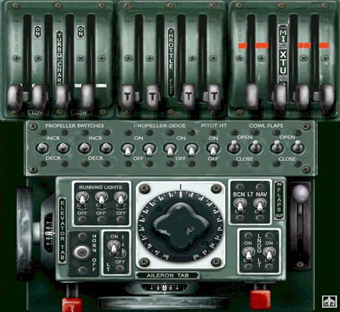
There are 12 levers on the quadrant and that
does not include prop levers, whose function is done by
switches in this AC. There are throttle and mixture for
each engine of course, but the extra four are for the
turbochargers. If you want realistic control they have
to be set separately from the throttles, BUT, if you
decide to do that you cannot use an external throttle
control.
If you decide you can live without the realism
of the separate supercharger controls, you can signify
that and continue to use your external throttle. The
supercharger levers will follow the throttles and MSFS
will do its magic in the background – as long as you pay
attention to the mixtures. |
|
Throttle Pop-up |
Checking weight and balance yields a surprise. We’re
3,300 lbs overweight. The default load-out is ALL the
fuel, ALL the bomb load and ALL the crew (at 220 lbs
each, lugging all that sheepskin and survival gear). If
you want a lesson in aborted take-offs or flight in
ground effect while exploring the back side of the power
curve, leave the loading as it is. Just like most AC of
the period, you can’t fill everything and fly, at least
not very well. Life is full of compromises. In WWII, how
much bomb load you carried was determined by how far you
were going and how much fuel you needed to get there and
back. What remained of the payload capacity when the
required fuel was aboard fixed the bomb load.
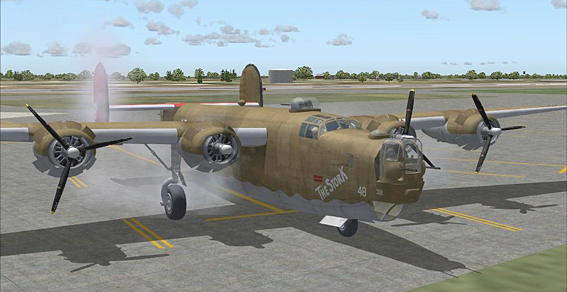
Engine start is satisfyingly realistic, but not so
complicated as to be a pain. Battery switch on, set the
brakes, line up the fuel valves, fuel boost pumps on,
set the levers, hit the primer, turn on the mag, press
the starter. When the RPMs and oil pressure stabilizes,
turn on the generator. Repeat for each engine – it’s as
easy as 3, 4, 2, 1.
|
 |
|
Starting #3 |
|
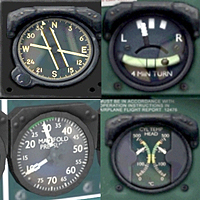 |
The primary engine gauges are great. Manifold pressure,
RPMs and oil pressure gauges are dual indicating types
on a common scale, one for each pair of engines with the
engine number legible (really, they’re legible) on each
needle. There are dual face gauges of a different type
for oil temperatures and cylinder head temps and
carburettor inlet temps.
They look realistic, suggesting
the instrument types of the period. For the most part
they’re easily read and in any case have mouse-over
labels that pop up with the readings. They are entirely
satisfactory, though in a few cases near the right edge
of the screen the tabs are partly out of view. Lacking
are exhaust temperature gauges, which would make precise
leaning of the engines easier. CHTs are OK, but are much
slower to respond.
|
|
Collage of Gauges |
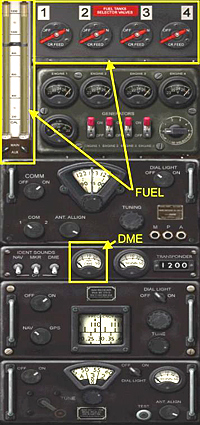
Fuel gauges are on a pop-up along with the generator
switches, voltmeters and an ammeter.
The gauges are –
I’m not kidding about this – a pair of level glasses.
There’s a small valve below each to line them up to read
the second set of tanks. Now, for real, the system is
more complex than it seems. It included remote
transmitters and such behind the scenes in the real AC.
It’s more than just a simple gauge glass, but what you
see are two sight glasses. That’s the style of the
readout - more of that immersion we love.
Controls and instruments are well laid out. There’s a
sim-icon in the 2D cockpit to take you to the co-pilot’s
side because everything can’t be seen from the left
seat; another button takes you back. The co-pilot has no
flight instruments except a mag compass. If you’re going
to drive, you have to do it from the
left side.
There
are icons for the radio stack (a short stack – more
later), the throttle quadrant, which has a lot of other
things too, and the fuel and electrical panel.
There are
also sim-icons for the GPS, the map, the kneeboard and a
toggle for the yoke. One nice touch is a panel switch
(not a sim-icon) to centre up the outside view if you’ve
“raised the seat” on approach. You don’t have to bat the
spacebar to get back to the correct point of view as you
cross the threshold – just click the switch. |
 |
|
Fuel & Electrical and Radio Pop-ups |
You’ll like the VC. It’s clear and easy to use. What I
like best is that if you centre it up you have a good
view out the window AND can see all six of the primary
flight instruments AND the OBI without having to scan
around. It’s made with approaches in mind, even an ILS
if you need to. Most VCs are not laid out so well. OK, I
have to admit it’s the magnetic compass that’s visible
in that view, not the DG, but it’s still a pretty good
set of what you need on approach, all within view
without panning.
|
 |
|
Virtual Cockpit – Zoomed Out |
The DG is up on the centre of the panel, above the rest
and realistically blocks the view to the right front.
The heading bug is a pair of parallel lines that frame
the indicator needle when you’re tracking it. The DG
takes a little getting used to. It’s like a clock. The
hand moves, the scale does not. If you’re flying west,
the needle points to your left. The rotating card and
lubber’s line we’re accustomed to is nowhere to be seen
– except in the magnetic compass.
The radio stack is convincingly “period”, all
black-painted, stamped metal faces with white celluloid
dial cards and a hint of pre-historic, or at least
pre-silicon electronics. There is one COM radio but it
has a switch that lets you use it as two. There is one
NAV radio and it doesn’t have that switch - one is all
you get. There is a DME readout, but it’s a little tiny
ovaloid analogue gauge with a logarithmic scale and damned
few markings. There’s an ADF that’s pretty conventional
in operation but with primitive controls (including a
hand-crank) and readouts. There’s a transponder window
for setting the squawk, but none of the other bells and
whistles that transponders usually have. There’s a
switch for hearing the NAV Morse ID, one for the marker
beacons (and a corresponding light on the panel – just
one) and one for the DME ID. Can you fly IFR with that
stack – yup, if you’re good. Fortunately things don’t
happen all that fast at 150 mph.
OK, with engines running and all the gauges in the
green, we’re ready to taxi. Release the brakes and push
the throttle to the recommended 17 inches of manifold
pressure. I haven’t mentioned the sound yet. It’s good.
It’s really, really good. I’ve recently invested in one
of those devices that clamps to your chair and does to
your butt what a sub-woofer does to your ears, but isn’t
so annoying to the pets and other innocent bystanders.
In about two seconds you’re utterly convinced that your
chair has been placed between two pair of R-1830s…and
the best is yet to come. AlphaSim also provides a pair
of alternative sound files that have an increased level
of turbocharger noise – even better, though my
"ButtKicker" clamp-on doesn’t respond to that kind of
noise, just the low tones and thumps and bumps. Of the
dozen or so AC of all types I’ve tried it with so far,
the physical effects rendered to the chair from the B-24
is the best yet. More immersion.
|
 |
|
Cowl flap positions |
For me, the test of software that models a big airplane
is whether it feels big and heavy. Some don’t. If I
wanted to fly a Cessna, I’d fly a Cessna. Taxiing this
one feels right. The subtle inertia things are all
working like they should – it coasts a little when you
pull the throttles back, but not too much. It doesn’t do
that wobble-and-waddle thing that some of the lighter AC
do when they first begin to roll. It lags when you
accelerate – the engine sounds come first, but the
thrust takes a second or two to come on. The eye-point
is right and the swing of the turns and such are
convincing.
At the threshold, cowl flaps go to only half-open, flaps
three notches out – 20° – hold the brakes and bring the
throttles all the way up slowly. When you begin to
flinch at the thought of being pelted with broken
rivet-heads from the airframe, release the brakes.
You’ll have about 50 inches of manifold pressure and
she’ll begin to roll down the runway, ever so slowly.
Did I mention you need a long runway? It does track
fairly well; even with reality sliders at full, the
torque and p-factor effects are easily manageable with
just a touch of rudder. At 100 mph, set aside the
magazine article you may have been reading, make sure
the co-pilot hasn’t dozed off and begin to add back
pressure to take some of the weight off the nose wheel.
Some time later, when she’s darned good and ready and
not a moment sooner, the nose will begin to come up.
Care is needed to avoid dragging the tail-skid, which is
bad form and doesn’t help at all with getting her off,
but does keep the crew awake. Eventually, at around 125
mph she will begin to fly, unless of course you’ve
already run out of runway.
There’s an interesting line in the take-off check list…
“Depress wheel brakes once airborne to stop wheels.”
|
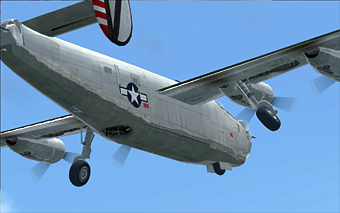 |
The Liberator main gear fold outward
when retracting (pretty neat to watch).
If the main wheels are still rolling
about 100 mph and you flip the gear
switch, bad things happen.
I won’t embarrass you by asking if you
remember your high-school physics but
the phenomenon of gyroscopic precession
comes into play and a nose-down force
results.
In heavily loaded real-world B-24s this
was a serious problem if that simple
check list step was overlooked. |
|
Outward-Folding Main Gear |
Five seconds after lift-off and clawing for
the first few hundred feet of terrain clearance is a bad
time for a nose-down input from any source. I tried to
detect that effect in FS and couldn’t. I don’t think the sim engine is capable of modelling it. From my reading
elsewhere, it was not subtle. None the less, our friends
at AlphaSim kept that step in the check list to keep
things real. My respects, gentlemen!
After that hair-raising take-off performance, once
cleaned up, the AC climbs surprisingly well using the
recommended speeds and settings, 170 mph, 46 in. Hg and
2,600 RPM. Leaning is critical as you climb but the
turbochargers carry the day and power remains strong
most of the way up to the service ceiling of 28,000
feet. Once there, 33 inches and 2,200 RPM yields a
miserly 2,000 pph or so, which will take you a fair long
ways in an AC that carries over 2,800 gallons of fuel.
Fuel burn during the climb is another matter, of course
and is anything but miserly. I learned to figure 2,000
lbs to climb, 2,000 per hour to cruise and a 2,000 lb
reserve. It’s easy to remember, but be happy Uncle Sam
is buying the gas.
Interestingly, the B-24 has cruise flaps, a setting that
deployed them to 8°. They were prescribed for flight at
or above 25,000 feet and airspeeds up to 170 mph
indicated, though were especially important below155
mph. Everything, by the way, on the B-24 is, or should
be, in mph, not in knots. The airspeed indicator is in
mph and most of the technical references in the 27 page
PDF manual (though not all) are too. The cruise flaps
lower the nose slightly and make up the lift lost due to
the lower angle of attack. The effect is to create the
same amount of lift while slightly reducing overall
drag. They work.
Cruise speeds of around 150 mph indicated result from
the recommended settings. At 28,000 feet, that’s a GS of
around 210 and isn’t so bad. You can push up the MP and
go a little faster but the fuel burn is shocking.
For the purists who choose the realistic supercharger
controls, AS includes an Excel spreadsheet that allows
balancing the throttle and supercharger settings to
achieve the desired engine power at a given altitude – a
nice touch.
|
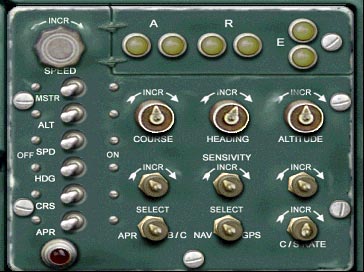
The included autopilot looks nice (rustic, but nice) but
isn’t really capable of much except tracking a heading
and holding an altitude.
It does those very well. The
OBI needle(s) respond to the radio but the AP doesn’t
seem to be capable of tracking anything except in
heading mode.
It’s not as bad as it may sound and is
probably relatively realistic.
Descents are a protracted affair and need to be planned
fairly well. A rate up to 1,000 fpm is comfortable and
airspeed is easily controlled. Get it a little too much
nose down and things can begin to diverge on you. My
hard-earned advice is, manage it, don’t chase it. |
 |
|
Autopilot |
Approaches are good once you come to grips with the fact
that the airspeed indicator is in mph, not in knots and
your speed isn’t really as high as the numbers on the
meter might suggest. You should keep your brain in the
loop at all times. The Lib is well behaved in the
approach; gear creates a little drag but not much pitch
change. Flaps do affect pitch in the expected fashion,
but not severely. The AC reacts to inputs in a staid
manner, just as if it really weighs 50,000 lbs or more.
Did you remember to retract the ball turret? If you
think dragging the tail skid is dramatic…
110 mph is a good approach speed and slowing to 100 over
the threshold is advisable. A little flare is needed to
ease the descent rate, but remember that tail skid – too
much nose up is not going to make you popular with the
crew chief later. If you’re landing back where you took
off and you fly the approach by the numbers, you’re not
going to have to worry about runway length. If you had
enough pavement to get it off you’ll have a lot more
than you need to get it stopped, even if you’re still
heavy.
Conclusion
AlphaSim did a great job on this one, though it’s no
more than I’ve come to expect from them. They are very
good at choosing aircraft types that capture the
imagination and then making them seem real. That, after
all, is the ultimate compliment for a simulator add-on
like this – to be able to say it seems real. This one
surely does.
I was able to manage realistic medium-range cargo
mission profiles at high gross weights in IMC conditions
and could have done much longer ones. Navigation with
the limited and primitive radio gear does require a
little different technique and a little more work but is
not problematic. The GPS is available, but not
necessary. With some practice it was not a difficult AC
to fly at all, though takes a little familiarization if
you’ve been hanging out in glass cockpits with ITT
gauges.
This one is not just eye candy that leaves you short on
the things that make an AC rewarding to spend time with
in FS. It has everything you need to fly it
realistically, either in today’s ATC environment or in
re-creating the real-world missions flown by the heroes
of the 1940s. Fly it heavy, high and far and experience
a little of what they did. It’s an eye-opener. Set the
weather for a 5,000 ft, 9/10 overcast, launch from RAF
Shipdham and see if you can find Berlin without using
the NAV or ADF or the GPS (Navigator to Pilot: Sir,
…what’s a GPS?)
The Liberator goes for around $46 USD or a bit under £24 GBP. It’s
well worth it.
John Allard |